Telemetry
Telemetry works only with the following type of devices:
- Enapter Electrolyser
- Enapter Dryer
- Enapter AI-4
- Enapter RL-6
If you don't have any of this device, don't worry. In this tutorial we will use RL-6 simulator.
Get the simulator source code from here and setup a Standalone UCM as described in the tutorial:
- Create device in the cloud.
- Upload blueprint via
enapterCLI. - Run Standalone UCM via
docker_run.sh.
Find UCM id on the device page and subscribe to its telemetry:
mosquitto_sub -v -p 9883 -h <GATEWAY_IP_ADDRESS> -u public -P public -t "telemetry/v1/<UCM_ID>"
You should see something like that:
telemetry/v1/<UCM_ID> {"timestamp":1664851516,"r1":false,"r2":false,"r3":false,"r4":false,"r5":false,"r6":false}
telemetry/v1/<UCM_ID> {"timestamp":1664851517,"r1":false,"r2":false,"r3":false,"r4":false,"r5":false,"r6":false}
telemetry/v1/<UCM_ID> {"timestamp":1664851518,"r1":false,"r2":false,"r3":false,"r4":false,"r5":false,"r6":false}
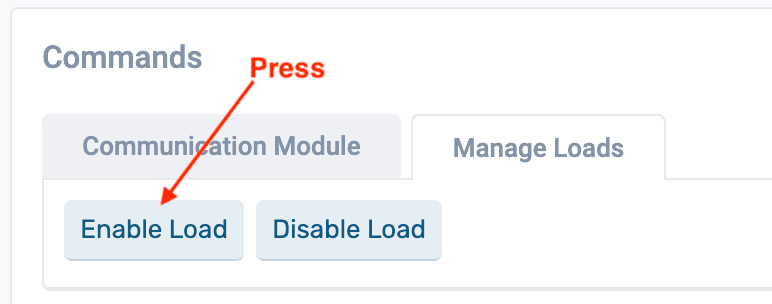
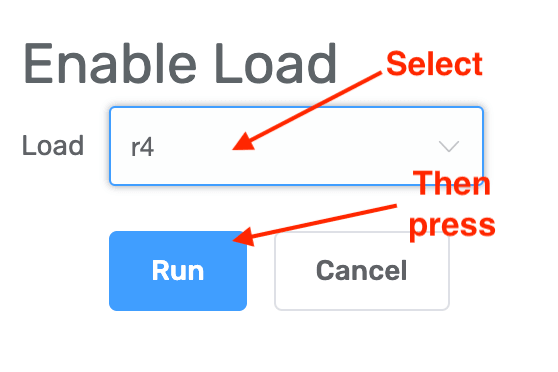
Try to execute command via cloud interface:


The subscription output should change:
telemetry/v1/<UCM_ID> {"timestamp":1664851975,"r1":false,"r2":false,"r3":false,"r4":true,"r5":false,"r6":false}
telemetry/v1/<UCM_ID> {"timestamp":1664851976,"r1":false,"r2":false,"r3":false,"r4":true,"r5":false,"r6":false}
Please spot, that r4 change from false to true.
💬 Need Help?
Have a question or hit a roadblock? Join the Enapter Discord community to get quick support, exchange ideas, and collaborate with other developers and energy experts.